Friday, December 27, 2013

I'm in LOVE with Timbergrove!!!

This is my post up at Frosted Designs today:


Well, I hope it's warm and cozy wherever you are.  I know it's always warmer here in Phoenix, Arizona so I won't rub it in.  But every year we make a trek to a local festival so that my son, Joseph can play in the "man-made" snow.  Yes, we actually pay $2 for 5 minutes so that Mommy can get some snow pictures to scrap.  It usually takes me $6 and 15 minutes to get what I want and my little guy is such a trooper to pose for me in between all his playtime!!
Now..due to this information (lack of snow in Phoenix), I will apologize now that you will see the same photos over and over on the following layouts.  But, that's ALL the snow stuff I have to work with and it takes effort just to get these photos!!!

So, I was waiting patiently (ok not so patiently) for Fancy Pants Timbergrove to arrive at the store so I could scrap my annual snow photos.  

The first three layouts I did (all in one night)....
***********************************

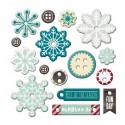
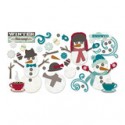
Joseph had fun putting the different pieces of die-cut snowmen together until I found the perfect combination to use on this layout.  I used the small alpha stickers for my title and a few of the stickers as accents.
I used a sketch by Wendy Antenucci.

****************************
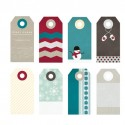
I removed the string from the tags and replaced it with my own twine.  
But then I used that string I had removed to hook the mittens together.
I used 3 different styles of the small alphas for the title "Snow in Phoenix"...yes all of those alphas come in this set!!  For this one I used a Pagemaps sketch.

**********************************
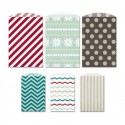
Here I used the larger alphas and some stickers, a tag, chipboard (from the button set) and buttons for accents.  I also cut open one of the envelopes (maroon diagonal stripe) and used it like paper.  The twine is an addition from my stash.  And this one was a sketch from Sketches with a Twist.

*******************************
So after I let those first three layouts digest for a few days...I just couldn't STOP using this line!!

I just loved using the patterned frames on this one!!

************************************

And some random pieces of the papers on this one (and another one of those darling frames) and I LOVED the corrugated paper that comes in the kit!  I used another sketch from Wendy Antenucci on this one!

******************************************

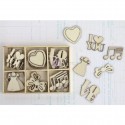
I had fun with this one...the wood frames are from my stash, but I love how this one turned out!!

************************
And finally...I really thought this one sheet of paper was the most eye-catching piece and was really the ONE piece that sold me on the whole collection.  
But then when I got the stuff in my hot-little-hands, I actually was intimidated to use this paper and do it justice and not cover up all the cuteness!!!  (Anyone else ever feel that way?)

So, I chose one 5x7 and placed it just left of center.  I added some brown cardstock, kept my journaling on a tag in one of the envelopes (lower left) behind the photo.  I added some random stickers but decided this one didn't really need a "title".  It just "is".  I'm so thankful that I pulled this one off and this is actually my favorite layout from this collection so far.  


I still have quite a bit of the line left, but I need to put it away for a while and work with something "warmer"...lol!!

But seriously, if you have winter photos, YOU NEED THIS LINE.  
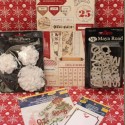
The collection pack comes with alphas (multiple sets - minis in different fonts and a larger set), stickers, border/tape stickers, 2 pieces of corrugated paper and 12 sheets of patterned paper!!
The teal and light blue with the maroon and grey....LOVE LOVE LOVE!!!!


Thursday, December 26, 2013

Frosted Designs - Dec kit - 2nd post

This is my post up at Frosted Designs today:

I'm back to share a few more layouts that I completed with the December Season of Stars Scrapbooking kit.  I shared my first 4 layouts earlier this month...and I said I'd share my last 4 layouts and 2 cards ... but I lied... the other night, I was picking through what was left and I had just enough paper .... and with the extra embellies, I actually got two more layouts done.  So that was 10 layouts and 2 cards.
Plus I used some of my extra embellies and alphas on the Silver & Gold Challenge layout...  This kit just keeps on giving and giving!!!

So, here are the other projects:

I love this sheet of paper!!!  So perfect to use "whole"....  I folded back the top left corner since I really like the back side too!!

I love that it already had the large word "Joy" on the paper but I wanted to dress that up a bit, so I added the words Holiday and Joy from the transparency die cut from the add-on.  
I also wanted to mention that I used the journal card from the kit (see below, it almost looks blue)...I placed it so that it highlighted words from the background paper.  I also put one of the wooden banners UNDER it and clipped one of the gold star clips on it.


On this layout, I went clean and linear.  I nice little block with some papers and strategically placed embellishments.

I used mist on this flower from the add-on, but I didn't "spritz" the mist, I removed the cap, and used the wand to literally "paint on" the ink.  I layered this with some of the trim, chipboard and rhinestones.


I split 2 sheets up for this one and placed my photos along the center, separated by my journal box (from the add-on).  

The clear transparency that frames my photo is in the main kit and is not really a frame - I just cut out the center so it didn't cover my photo and turned it into a frame.


I really wanted to use the musical notes paper and that's pretty easy for me considering  I have a drummer, keyboard player, ukulele player, iPod/shower singer .... all in one son!!

I painted the gold glittery thickers with red paint to match my layout.


I also made two easy-peasy cards.
The left on is literally the transparency tree die cut from the add-on...glued onto the card!!
The right card is chipboard words from the add-on, painted and a little added glitter, grounded by a little strip of the washi tape (from the main kit). 


Ok..so here is one of the "extra" (Ninth) layout that I did with my kit.  I used a sketch from Sketch N Scrap and used up some of my extra journal spots with my last tag and a couple pieces of chipboard.   (The green background cardstock is from my stash). 

 I used the Thickers from the kit, but added some silver glitter over the top but you can still see the Gold too.  I liked that contrast.


And this is my 10th layout with this kit (I used a sketch by Tammi Bennett) 
All I had left of the paper was the red w/white snowflake piece, and I used a kraft tag from the kit and the snowflakes are from the add-on.  (Alphas & Cardstock from my stash)


So...thanks for reading this far .. I hope you're still here!!
I had such a great time playing with this kit... I know you will too!!


Monday, December 23, 2013

A few fun things and a message

Ok...so message first:

HAPPY HOLIDAYS to you....Blessings for your families for the New Year!!

And now some layouts that I realized I had posted for challenges at My Scraps and More, but have never put them on my blog:

These first 2 are ones that were taken at Joseph's Birthday Breakfast at the St. Francis....what a memorable fun breakfast!!


And then some random ones:

Football


Joseph's friends on 1st day of school


Old photos (and a new one) of me and my brothers:


Friday, December 6, 2013

Sky High & Handsome Little Boy!!


This week at Frosted Designs we have a new challenge.... to use Silver & Gold on your project.

I used some of the leftover embellishments from my Season of Stars scrapbooking kit (available for purchase at Frosted Designs) for my silver/gold elements on this layout.

The mist is Heidi Swapp Color Shine and has a bronze (so we're going to call it Gold today) glimmer to it.  I added Silver sequin stars.  The word SKY is Gold Glittery Thickers that I used Rangers stickles and added a layer of Silver so that they are literally silver AND gold....


Also, I used the December 1st sketch at SKETCH N SCRAP and my Frosted Designs December kit (mentioned above) to create this:
Here is the sketch:


Tuesday, December 3, 2013

Season of Stars - December kit from Frosted Designs!!

FROSTED DESIGNS


This is my post for today over at the Frosted Designs store...
Check out the fun I had with our December kit... Season of Stars!!


As the holidays are quickly approaching, I always find myself reminiscing about past years.  I guess that goes along with "time flies" and the fact that my one and only son is now TEN years old!!

So when I spread out the Season of Stars December kit and the add-on on my scrapbook table, I knew I wanted to do a couple shots from this past year, but I also wanted to dig out some older (favorite) photos.

Now...before I share...I want to say that I have "used up" my kit...I have no paper left but I still have a few embellishments of this and that...and of course some of the washi tape.  
But I completed EIGHT layouts and 2 cards.
I'm so thrilled that I got so much out of this kit!!
So today, I'm going to share my FAVORITE FOUR layouts and then later this month, I'll share the rest.

This was the first layout that I created.  I layered the tags with some of the trim, Teresa Collins chipboard & misted the flower to cover up a print on the paper that I thought was distracting for my specific theme of my layout (it's a cute design...just didn't work for me on this)! 


I added Kraft cardstock from my stash and on the left photo mat (vertical), I was trying to figure out how to use the transparency that came in the kit.
I ended up tracing the first 3 trees, then flipping it over to line up the center (small) tree and then trace the larger ones again.  I colored them in with my Copics and topped them with the BoBunny Rhinestones.
Sorry for the glare on the photo, hard to get a shot of that transparency showing what I did!


Next I wanted to play with the really cool gold starred kraft cardstock sheet from Studio Calico.

I toned down my photo area with some paint, then added some hearts in the paint using a Heidi Swapp Heart mask (available in the Frosted Designs store).
I also painted 3 of the chipboard words from the add-on and used them as my staggered title elements.
Just a few strips of the Carta Bella papers & some of the Washi tape for a touch of color behind my photo.
I added some of the sequin stars and bling and the gold star clip for accents.


Next, I had some older Santa pics that I sized smaller and I really enjoy doing a good graphic style/color blocking layout!
So, my trick is to build the layout on the 8.5x11 and then add it to 12x12 paper and then "connect it" somehow.  I used lots of the different embellishments on this layout and then my connection is the stars that bleed from the 8.5x11 onto the 12x12 sheet.  

I had fun with this little cluster of wood, chipboard & sequin elements.


And the last one for today...is actually the VERY LAST layout that I completed.
Yep, I 'm going to show you NUMBER EIGHT..... 
Why?  Because it's one of my four favorites...isn't that funny...I was down to scraps of my papers and decided to try to use them up.  Ended up being one of my favorites.  

I added a lot of stitching to hold the top and bottom borders together, and I left a lot of white space to give your eye room to rest since I have so many different patterns on this page.   I wanted to show a close up of the tag since it's hard to see how I used the rhinestones on it.  And that little strip of red rhinestones was a leftover ... again, using up my scraps!!


So...I hope you like my first four layouts with the December kit and add-on.

The combination of different paper lines and awesome embellishments made this fun and really easy to tap into my creative juices!!
I had an absolute blast playing with this kit and really encourage you to grab one.