Monday, May 26, 2014

Love Frosted Design kits...and a coupon code!!

Here is my post today at Frosted Designs!!


I've really been enjoying playing with our monthly kits!!!  It's Joni today and I'm going to share a few layouts that I did with the May Simply Sweet kit.

Now the first thing I'll tell you about this kit is that I have a more "boyish" style and so I find it challenging to use pastel or flowery products when I scrap.   So, at first glance, I'd probably have normally passed on this kit, but when I got a look at how much stuff was loaded in this kit....well, I just figured I'd give it a shot!!! -- and I'm sooooo glad I did...I found it really easy to work with, even though I initially thought it "wasn't my style".   Here we go....

I really loved that kit has elements that are kraft colored... I LOVE KRAFT!!!

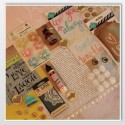
In this first layout, I was inspired by the "together" tag .  I used the "always" script word, the wooden arrow, flowers, buttons, word stickers ... all from the kit.  Also, the white dots were made with the Viva Paper Pen (it's like liquid paint).  And...Oh my, that Prima Chalk Ink pad to distress my edges...LOVE how it fits in my hand and the coverage is perfect!!!    I did add twine from my stash and used quite a bit to add movement to the layout.


Here is closeups of my clusters:


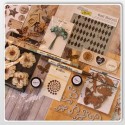
On this second layout, I went for the "yellow"!!
I outlined the "Choose Happy" with my Gelly Roll Glaze Pen to help make it stand out.

I used the Glimmer Glaze to paint the top border which I cut from one of the papers.
I used 2 tags, a few small pieces of papers, wood arrow, word stickers, the chalk ink on the edges and the paper/paint pen to make a few dots.  Twine from my stash.


Finally, here is a layout that I did using a combination of both the April Beauty of Nature kit and the May Simply Sweet kit.

I started with the Marion Smith paper called Up, Up and Away.
I used the Harlequin (diamond) stencil from April's kit on the background with the Prima Chalk Ink pad.
I also used the stencil from the May kit with a mix of molding paste & paint to add the Live, Love, Laugh quote.  I had a few issues with my paste being too thick, so I went over this area with the Chalk ink pad too.
It's a little darker than I had planned, but I can "Live, Love and Laugh" with it!!

I used embellishments from both month's kits...they really seemed to match PERFECTLY!!
I won't list every embellishment, but the only extra thing I added was a little twine...
everything else is in the kits!!


I hope you have as much fun playing with your kits as I am!!  

As May comes to an end, we thought we would have a little Mixed Media fun! 
Today starts the first day of our Mixed Media May-hem!
For 3 Days only, you can get 30% off all of your favorite Mixed Media Items! 


Be sure to use the code MAYHEM at checkout to receive the discount! 


Tuesday, May 20, 2014

Sketches in Thyme & Mom Card

This week at Sketches in Thyme, our challenge is to use any sketch we want....

So I used this at  My Scraps & More, sketch by Audrey Yeager.

I flipped the sketch left to right to use the photo better:


And...here is a card I made for Frosted Designs challenge to use this as inspiration:


Monday, May 19, 2014

Frosted Designs -- April Kit

Here is a post from Frosted Designs last week...(I didn't realize that they used it and I forgot to put it up on my blog)...

----------------------------------------------------------------------------------------------------------
Hi..it's Joni here and yes...it's May and I'm playing with my new May kit, but I have a couple layouts from last months kit to share with you. 

When I finished these 2, I realized that I basically used the same design on both of them....guess I'm pretty predictable!!  

On the first one, I started with the wood grain paper and it already has the white splotches on it.  I used modeling paste mixed with the Lindy's Brown (kit) and added it with the harlequin stencil (kit).  Now...I mixed up way too much of the brown modeling paste, so a trick to not waste it is to just grab another sheet of cardstock and apply some and make another background to use later.  (There's a point to my "tip").

I then mixed some of the Lindy's brown with water and flicked it around the layout with a paint brush.  I also used this mixture to paint the Prima flower to make it more "boyish" for this layout.  I also used this mixture to paint the chipboard flourishes and used the distress markers to accent them.

I fussy cut the balloon/journey from another sheet of paper in the kit and popped it up.  A few other embellies, butterflies, stickers & pearls....(and twine from my stash)....done!!


So...remember above where I said I just created a random background with my extra modeling paste/Lindy's mixture?  -- Guess what I did next?   So after I got looking at this background, I realized that the color that I had created was "Kraft" -- good, because I love kraft!!  I added some flowers here, and the "LOVE ink bottle"...well I just busted off the top and used the bottom with the word and tucked it right up against the paper.


Grab yourself an April kit if you haven't already...and if you have, you'll know how much fun it is to use these gorgeous neutral colors!!


Friday, May 2, 2014

A few layouts...getting caught up...

A few layouts I've done for challenges recently:

April challenges at Memorable Seasons:

This was a sketch challenge --- This is Joseph's most recent school photos from Spring 4th Grade.


Polka Dots:
I made these 2 cards (in lieu of a layout)


4 Colors:
(journaling on this one is fun...documented stuff about Joseph at this stage of his life)

Topic "Spring"
(ok..so in Phoenix, rain is in August...close enough)

Use a "premade" title...
This is NOT my favorite layout from a creative standpoint, but I'm really glad to get this story documented.
Mom...be sure to enlarge and read it to Dad...he was there!!

Another Sketch:


Gun show

This post is for Grandma and Grandpa....they don't do Facebook so this is how I need to show them these photos:

DAY 60 -- RIGHT ARM


DAY 1 RIGHT ARM (not bad to start...but wow...look at the difference above!!)


 DAY 60 - FULL BODY -- CHECK OUT HIS SHOULDERS AND ARMPIT AREA...

DAY 1 - how he started